Learning about technological modelling with junior students
Junior students learnt the importance of modelling to test their in a programme of learning based on the technological modelling component of the technological knowledge strand. They used feedback from their models to develop their medals or jewellery.
Te Kura o Otangarei teachers Karen Crosbie and Ngapoko Ashford were relatively new to teaching technology. Ngapoko says that her background experience of adapting patterns in dressmaking, and looking at building plans gave her more confidence about teaching technological modelling to her year 2–3 class.
Exploring technological modelling in years 2–3
Ngapoko introduced technological modelling by telling her class about looking at house plans when building a new house and laying patterns on the floor when sewing.
She continued this theme by reading the story of The Three Little Pigs and discussing the different types of house.
- Which was strongest?
- Why did the pigs make it out of this material?
- What was the purpose of the house?
- If you were building a house, what might you need?
She extended the discussion to a different One student talked about her grandmother using patterns when making alterations to the size of clothes. The students talked about the different kinds of modelling that might be used to test when developing clothing.
Ngapoko emphasised that the focus of the programme of learning was modelling. She explained the purpose of technological modelling, and that students would their designs to see if they were suitable as they developed an . They discussed how functional models can be used to help make decisions.
Making a visual model
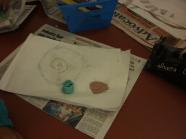
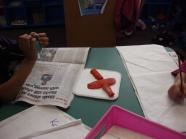
The students thought about what they wanted to create and modelled their design as a drawing. Some had quite simple designs, for example, a cross or a plain bangle. Others had designed jewellery with lots of detail such as flowers or hearts.
Making a cardboard model
For their next model, the students copied their design onto cardboard and cut it out. At this point, those with more complicated designs realised how much cutting out they would need to do: “It’s too hard, Whaea Ngapoko!”
The students could immediately see the value of modelling in cardboard before moving on to other materials. Many of the students modified their designs as a result of the modelling. All of them began to realise that the purpose of functional modelling is to find out if a design will work. A few students were determined to carry out their original design. They painstakingly cut out numerous cardboard shapes, and spent time making the small shapes in each modelling stage.
As the children talked with each other about their designs and models, they related the shapes they were using to the work they had done in Maths the previous term.
Making a playdough model
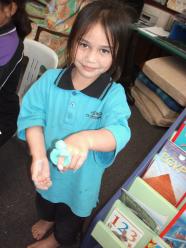
The students made a third model out of playdough, to continue testing their design. Ngapoko found that many in the class had limited experience with manipulating this material. Next time she would allow time for them to play with the dough first. A few who made their model by placing separate pieces together found that the model fell apart when the play dough dried.
Ngapoko noticed that many students hadn’t thought to include a hole from which to hang their pendant. She used this as a teaching point to discuss how functional modelling allows people to see if their product will work and to make decisions about modifying their design. This provided an opportunity to reinforce to students the purpose of functional modelling. When those students discussed their models with Ngapoko, she asked how they would wear it. Some responded that they could put sticky tape on, pin it, or hot-glue it. Some trialled using sticky tape or a pin and found that these weren’t realistic options, so they changed their design to include a hole.
Ngapoko says that students also talked about each other’s models. “There were lots of conversations about the process and what they were learning about functional modelling.” The functional modelling showed that the jewellery couldn’t be worn unless it was modified to include a hole.
Making a salt dough model
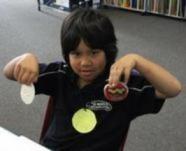
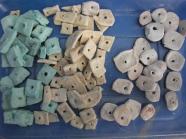
Next the students made and baked salt dough models to test their designs. The students could assess how well their design worked when it was hard. Some painted their model as well. Modelling the design again proved its worth for some students. One girl realised she would have to make her bangle bigger, because the salt dough model wouldn’t fit over her hand. Another needed to make a necklace bigger because it didn’t fit. During these conversations, Ngapoko discussed the concept of '' – if something didn’t fit, it wasn’t functional, so it needed to be changed. Some students, she says, were a bit upset when their model didn’t fit, but they knew they could improve it in the next stage of modelling.
Ngapoko also used this opportunity to develop students’ understanding of techniques when working with the dough. The students would be working with polymer modelling clay, a material that required similar manipulation skills, for their final prototype. This included rolling the material out evenly. One student discovered that her bangle broke, and said that next time she would need to roll out the dough more evenly to avoid it being too thick or thin in different parts.
Making the final outcome
The students made their final out of polymer modelling clay. This is baked in the oven to make it hard. This material was a challenge at first because it’s quite hard in comparison with the salt dough. The students had to work with it for a while to make it soft and malleable. Ngapoko told them to play with the material first, and gave them a small piece. This to students taking more care in rolling the clay so that it wasn’t too thick for their purpose. This practice, combined with the students' increased skill in manipulating the material, resulted in more success with this model.
The student outcomes varied. Some made one polymer clay model, some made one, two or three rings, and others made an item such as a necklace with lots of beads on it.
At the end, all the students understood much more about functional modelling. They understood the variety of modelling tools that could be used to explore their design to that their final piece of jewellery would work. They could all describe what a functional model is, and its purpose.
Exploring technological modelling in years 3–4
As a for learning about technological modelling, Karen asked her year 3–4 students if they would like to create medals for presentation at the school’s mini-olympic games. The class decided to do this, but as the programme of learning evolved to incorporate more forms of modelling, they ran out of time to present their final outcomes. However, Karen says, the students were fully involved in every aspect of their modelling. The original end-purpose was irrelevant – none of the students mentioned the mini-olympics.
Making a visual model
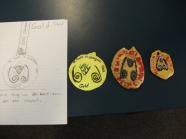
The students downloaded pictures of medals from the internet. They discussed what they wanted on their medals, such as the school name or images specific to the school. They sketched their designs and talked about the detail in their medal. Karen says “They understood that this form of visual modelling told them different things about their design.”
Making a cardboard model
The students next modelled their design in cardboard. They could clearly understand the point of doing so: “My cardboard model lets me see if the size is right."
Making a salt dough model
Students then made their design in salt dough. This enabled them to test their design in 3D and to think about the possible weight of their medal.
The students found that it was hard to incorporate the detail from their design with the salt dough. They realised that functional modelling, or modelling their ideas using salt dough, informed their design decisions. Some designs included words, but the students couldn’t write them on the dough. One student, Leone, had designed her medal in the shape of a person but found it too hard to make in salt dough. She changed her design and developed a round medal with a figure on top.
The students painted their salt dough models after they’d been baked to see what a final product might look like. At this stage, some students also realised that they should have made a hole in their model so that it could be worn, and some needed to change other aspects of their design.
"Making the salt dough model was fun. It showed me that there wasn’t enough room for the hole at the top of my medal. I learnt that I needed more space for the hole because someone broke it easily. If I made another one, I’d make the hole lower down."
Modifications due to modelling
As the students worked through their models, most simplified their design. They realised that the designs with more detail were harder to accomplish. Karen says, “They made heaps of modifications to the models as they went through, and a few went back to their cardboard model when developing their final .”
They realised that different functional models allowed them to learn different things about their medal. As a result, they were able to recognise the purpose of functional modelling. The students recognised how it enabled them to make changes and decisions based on what they learnt.
A model versus a prototype
Karen talked to her class a lot about the difference between the purpose of a functional model and a prototype. She told the students that when they developed their prototype in polymer clay, they needed to do it in a way that represented what their final product needed to look like (which they had determined from their previous functional modelling).
The class discussed suitable materials to use to hang their medals, and Karen bought cords and ribbons to suit individual preferences. At this point, in keeping with learning about prototypes, they evaluated their medals.
Enhancing literacy through technology
Students wrote about the modelling process and the changes they had made to their designs as a result of their modelling, first in draft form and then as a final version. To help with the writing, Karen wrote starter sentences on the whiteboard:
- The first part of the process was ...
- Some of the problems were ...
- The changes I made as a result of finding out about this were ...
Karen says that she used repetitive language to increase students’ technological vocabulary and to help them progress from curriculum level 1 to level 2 in technological modelling. She adds that conversations were the most important part of the whole programme of learning.

